When it comes to home improvement projects, one of the most significant upgrades homeowners can make is installing siding. It enhances the aesthetic appeal of a property, improves its durability, and can even increase its value. In the Bay Area, where the weather can vary from coastal fog to inland heat, choosing the right siding material is crucial. James Hardie siding is one of the most popular choices, thanks to its blend of beauty, durability, and energy efficiency. In this expert guide, we will delve into everything you need to know about Hardie siding installation in the Bay Area.
What is Hardie Siding?
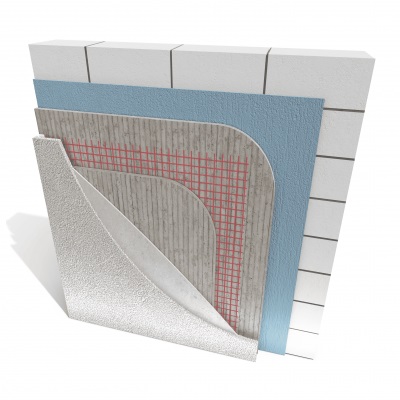
Hardie siding, also known as James Hardie fiber cement siding, is a durable and versatile building material made from a mixture of cement, sand, and cellulose fibers. It’s designed to withstand the harshest weather conditions, offering protection against moisture, wind, and fire. Hardie siding is available in a variety of finishes, including lap siding, shingles, vertical siding, and trim, allowing homeowners to choose the style that best suits their home.
James Hardie siding is known for its resilience, especially in regions like the Bay Area. This region experiences high humidity, coastal salt exposure, and extreme temperatures, making it essential to have a siding material that can stand up to these elements. Hardie siding has been tested for fire resistance, mold prevention, and pest resistance, which makes it an ideal choice for homeowners looking for a long-lasting and low-maintenance solution.
Why Choose Hardie Siding in the Bay Area?
The Bay Area has a unique climate, which can be challenging for siding materials. Traditional wood siding may rot or warp in the humidity and moisture prevalent in coastal regions, while vinyl siding can fade in the intense sunlight of inland areas. Hardie siding is specifically engineered to thrive in such diverse conditions. Here’s why James Hardie siding is the best choice for homes in the Bay Area:
1. Durability and Longevity
James Hardie siding is known for its exceptional durability. It’s resistant to harsh weather conditions, including high winds, rain, and even earthquakes—a real concern in California. Unlike wood, it won’t rot, warp, or swell. Additionally, it’s resistant to pests such as termites and rodents, which can be a problem in certain parts of the Bay Area.
2. Fire Resistance
Given California’s wildfire risk, fire resistance is a top priority for homeowners. Hardie siding is non-combustible, offering an extra layer of protection against flames. This feature is particularly important in areas with a history of wildfires or in neighborhoods where homes are close together.
3. Energy Efficiency
With the fluctuating temperatures in the Bay Area, from cool coastal mornings to hot inland afternoons, energy efficiency is key. Hardie siding helps insulate your home, keeping it cooler in the summer and warmer in the winter. This can result in lower energy bills and a more comfortable living environment year-round.
4. Low Maintenance
Another benefit of Hardie siding is that it’s incredibly low maintenance. It doesn’t require the frequent painting and upkeep that wood siding needs. Hardie siding maintains its color over time, especially when combined with pre-painted finishes that resist fading due to the intense sun exposure typical in the Bay Area.
Preparing for Hardie Siding Installation
Before starting the installation of James Hardie siding, there are a few things homeowners in the Bay Area should consider. Proper planning ensures that the installation goes smoothly and that the finished result will be aesthetically pleasing and functional.
1. Assess Your Home’s Exterior
The first step is to assess the condition of your current siding. If your home already has siding, it will need to be removed before installing the new Hardie siding. This includes old wood, vinyl, or asbestos siding, which may require professional removal. It’s also important to check for any underlying issues, such as mold, rotting wood, or water damage, that could affect the installation of the new siding.
2. Choose the Right Style and Color
James Hardie siding comes in a variety of styles and colors to suit any home. In the Bay Area, where many homes feature modern, craftsman, or coastal styles, Hardie siding can provide the ideal finish. Choose a style that complements your home’s architecture. The most popular options include:
- HardiePlank: The classic lap siding, available in smooth or textured finishes.
- HardieShingle: A charming, rustic look ideal for cottages or coastal homes.
- HardiePanel: Vertical siding, perfect for a contemporary aesthetic.
Once you’ve selected your style, choose a color. James Hardie offers a ColorPlus technology that ensures the color stays vibrant for years without fading.
3. Hire a Professional Installer
Installing Hardie siding requires specialized knowledge and tools. While DIY installation is possible, it’s recommended to hire a professional installer experienced in working with fiber cement siding. A professional will ensure that the siding is properly aligned, sealed, and weatherproofed, and can also handle the cutting of the siding around corners, windows, and doors.
The Hardie Siding Installation Process
Step 1: Preparation
The installation process begins with preparing the home’s exterior. The old siding (if present) will be removed, and the walls will be inspected for any damage that needs repair. In some cases, a new weather-resistant barrier (WRB) may be applied to provide extra protection against moisture. This step is crucial to prevent mold and mildew growth in the future.
Step 2: Measuring and Cutting
Once the area is prepped, the next step is to measure and cut the Hardie siding to fit the space. Fiber cement siding is heavy and hard to cut, so it’s essential to use the proper tools, such as a circular saw with a diamond blade or a miter saw. The installer must measure precisely to avoid gaps or overlaps, ensuring a seamless fit.
Step 3: Installing the Siding
After cutting the pieces to the correct size, the siding is installed starting from the bottom of the wall and working upwards. Each plank is secured with nails or screws, ensuring that it’s properly attached to the sheathing. For HardiePlank lap siding, the planks are overlapped slightly to ensure that rainwater runs off effectively. For vertical siding options like HardiePanel, the installer ensures that the boards align perfectly.
Step 4: Sealing and Finishing
Once the siding is in place, it’s time to seal the edges and ensure there are no gaps where water or air can penetrate. This step is essential for weatherproofing the home. Additionally, any trim pieces, such as corner boards, soffits, and fascia, are installed to finish the look and ensure that the siding is sealed tightly.
FAQs About Hardie Siding Installation
1. How long does it take to install Hardie siding?
The installation timeline can vary depending on the size of the home and the complexity of the installation. On average, it takes about 1-2 weeks for professional installers to complete the project. This timeline includes removing old siding, preparing the surface, installing the Hardie siding, and finishing touches.
2. Is Hardie siding more expensive than other siding materials?
While Hardie siding is more expensive than traditional vinyl siding, it is generally less expensive than high-end wood or stone options. The durability and low-maintenance features of Hardie siding make it a cost-effective choice in the long run. Additionally, its energy efficiency and fire resistance may save homeowners money on insurance premiums.
3. Can Hardie’s siding be painted?
Yes, Hardie’s siding can be painted. However, many homeowners prefer to purchase pre-painted ColorPlus siding to avoid the need for frequent repainting. If you do choose to paint, it’s essential to use high-quality, weather-resistant paint to ensure long-lasting results.
4. How does Hardie siding perform in earthquake-prone areas like the Bay Area?
Hardie siding is non-combustible and incredibly resilient, making it an excellent choice for earthquake-prone areas. Its flexibility allows it to withstand the shaking and movement associated with earthquakes, helping to maintain the integrity of the structure.
5. How do I maintain Hardie siding?
Hardie siding requires minimal maintenance. Regularly washing the siding with soap and water can keep it looking fresh. A new coat of paint can be applied every 10-15 years depending on the climate and exposure to the elements.
Conclusion
In conclusion, Hardie siding is a top choice for homeowners in the Bay Area seeking a durable, low-maintenance, and aesthetically pleasing option for their homes. Its ability to withstand the region’s diverse weather conditions, fire resistance, energy efficiency, and longevity makes it the ideal solution for protecting your home. By hiring professional installers and following the necessary steps, homeowners can enjoy the benefits of James Hardie siding for many years to come.